
Columnist Meghan White follows a tutorial for an ‘adult friendship bracelet’ but wouldn’t reccommend others follow it, too.
One of my favorite parts of writing this column is that I get to be a little bit selfish and make things for myself. I decided awhile ago that I wanted to follow an online tutorial for a designer-inspired, slightly more adult version of a friendship bracelet.
I had been sitting on this idea for about a month. The printed tutorial was in my idea binder–yeah, I have one of those like a suburban mom has for any snow or inservice day–and I had made the actual metal bracelet, instead of buying one, before school had even started for the year. It had been awaiting its fate in my “in progress box” ever since.
So when I had a spare afternoon, I decided to combat the drear of the overcast day with some crafting. Crafting while watching “Buffy” and complaining out loud to no one about my inadequate lighting, to be specific. And two episodes of “Buffy” later, I wound up with a pretty sweet bracelet.
That said, the concept behind this bracelet is more or less a combination of braiding and traditional friendship bracelet making. I’ve never been exceptional at either, although before I hacked my hair off I was getting almost decent at fishtail braiding it.
But seriously, despite my crafty prowess generally relating to embroidery floss, I had some trouble with this bracelet. It has something to do with tautness and impatience, and the fact that I can never find a happy medium between the two.
This tutorial has been adapted from Honestly WTF.
For the bracelet base:
The tutorial I followed told me that I needed a curb-link bracelet, and conveniently linked me to one that was almost $50 – no thank you. So I opted to make one instead.
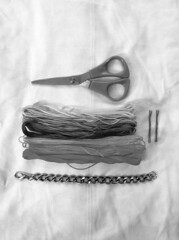
To make your own curb link bracelet you need:
A curb chain that is at least the size of your wrist, I used 24-inch chain from the jewelry section of my local craft store and then removed the length I needed.
Jump rings, 9mm
Lobster clasps, 23mm
Pliers, needle nose or jewelry specific ones
Steps:
1. If using a length of chain larger than your wrist, first figure out how large you want your bracelet to be. Remember though that some length will be lost once it is woven up, but also that the jump rings and lobster claw clasp will add length. Because of this, I made my bracelet length one link shorter than I would have had the clasp been smaller.
2. Using needle-nose-pliers, attach two jump rings to one of the end links on the bracelet length. Close the jump rings.
3.On the opposite side of the bracelet attach two jump rings, and onto those jump rings attach the lobster clasp. Then close the jump rings.
Now, if you want to you could stop here or modify the bracelet however you choose.
Supplies for a woven chain bracelet:
A curb link bracelet
Embroidery thread
Two bobby pins
Scissors
Steps:
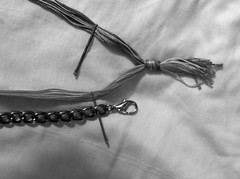
1. Cut two sets of 15 strands of embroidery floss, measuring 4 times the length of your bracelet. Since I used six colors, which were separated into two similar color groups, I cut five lengths of each color.
2. Knot your thread at the top, leaving about two inches of length above the knot.
3. Sandwich your similar color groupings, each of which should consist of 15 strands of embroidery floss, between bobby pins. These will act as needles of sorts.
4. Arrange your embroidery thread to the left of your bracelet and weave the first section of thread, the one nearest the bracelet, under and through the first link, pulling it through all the way.
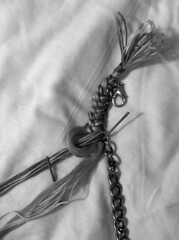
5. With the second section of embroider thread, go over the first section of thread. Then under and through the first link. Repeat this step with the first section of thread. Do the same braiding and weaving process down the length of the bracelet. At first this part will be sort of hard but it is fairly similar to actual braiding. The trick is to keep both sets of embroidery thread at an even tautness, which means you should really try to take your time. Also don’t hesitate to unweave and start again if you don’t like the outcome.
6. At the end of the bracelet secure the end of the thread with another knot. If you want to, for added security, you can add a drop of clear glue to the knots at either end of the bracelet.
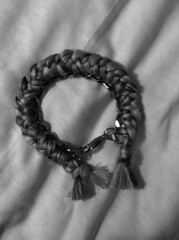
By the time you’re finished you should feel very accomplished because you probably wound up with a pretty sweet bracelet. I had fun both making and wearing mine. But if I was going to be completely honest, I’m not sure if this is a project I would do again.
Meghan White can be reached at meghan.white@temple.edu.


Be the first to comment