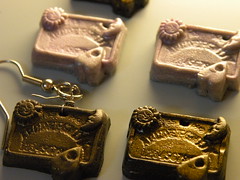
 Columnist Meghan White uses a silicone mold to make her Ghost Hunter-inspired Ouija board earrings.
I feel like this column should be prefaced with the fact that one of my best friends and I are somewhat obsessed with ghost-hunting shows.
We’ve spent far too many hours watching and cackling at people desperately searching for ghosts. Our favorite scenes of these shows, besides spiritual possessions, are when the family being haunted brought it upon themselvesby summoning a spirit and then burning a Ouija board.
So making my friend Ouija-board jewelry out of polymer clay made all the sense in the world. Especially because I had most of the required materials and I only needed to buy the mold. One of the best things about making polymer-clay jewelry is the multitude of things you can do with it.
I opted to use a mold, as sculpting has never been in my crafting-skill arsenal. Molds are accessible on the Internet and at craft stores.
My Ouija-board mold is silicone and was purchased on the Internet. Silicone molds are fairly inexpensive and you can find anything from cameos with cats or mermaids to ice cream cones and stand mixers.
At craft stores there are often silicone molds in the same aisle as polymer clay. Most of these molds tend to be hearts or doll parts. There is also the option of using harder plastic candy molds if you make sure to only use them for clay, though these tend to be harder to work with as it is harder to pop out the clay once it’s molded.
Supplies:
– Mold
– Polymer clay (I prefer Sculpey III for modeling purposes)
– Toothpick
– Butter knife
– Earring findings
– Jump rings or jewelry wire
– Needle-nose or jewelry pliers
Optional Supplies:
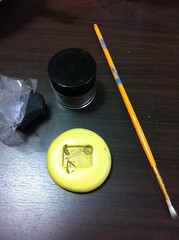
– Pearl Ex powder
– Paint brush
Some of the supplies – including earring findings and jump rings – are sold in large quantities. A set of earrings will require two earring findings and two jump rings. You can always share supplies with a friend, or make your own little jewelry factory in your living room. I personally like hoarding all of my craft making supplies for doomsday. I may have been on the same set of earring findings since I was 10 years old, but I can keep crafting well into the apocalypse.
Steps:
1. Gather up your supplies and make sure your workplace is clean. You don’t want to get any dust in your mold or clay.
2. If you’re using Pearl X, which can give a nice metallic effect to your piece, dip your paintbrush into the powder and tap off the excess. Then spread it around the mold. This gives more dimension to your design. And in my case, it also turned the clay I had on hand into different metallic colors.
3. Knead your clay and use just enough to put into the mold. This will take some experimenting, but I found it was better to mold thinner pieces in order to have it hang properly from my jump rings. Another option is to use jump rings with a larger diameter.
4. Pop the design out of the mold. If you’re using a silicone mold, it should just pop out. If you’re using a harder plastic mold, such as a candy mold, you may have to manipulate both the clay and the mold to get it out without ruining the design or breaking the mold.
If there is excess clay around the edges of the design remove it with a butter knife. Or if you’re super fancy you can use some sort of clay tool. Here I would also suggest waiting for approximately 10 minutes – especially if your design is more three dimensional – for the clay to cool down a bit before you cut off the edges.
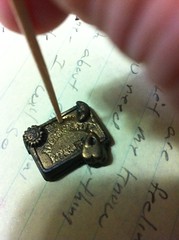
5. Poke a hole where you want to attach the jump ring. For my Ouija-board earrings, I tried both the top center of the board and then to the top right of the board. Remember, if you royally mess up you can always just knead up the clay and remold it.
6. Make as many of your designs as you want.
7. Bake your clay pieces according to the directions on the package. Make sure you don’t overbake the pieces or they may become somewhat fragile, and if you listen to the packaging there may be issues with fumes, too. Under-baking just means you have to put them back in the oven.
8. Attach the jump ring to the clay design and then attach to the earring finding. For this step you can use needle-nose pliers, but this is a bit difficult as they aren’t the most delicate of tools. You can also use your fingers if it really comes down to it. Ideally though, use a pair of jewelry pliers. If you’re feeling extra ambitious, or have jewelry wire on hand but not jump rings you can coil jewelry wire and use it to attach the clay piece to the earring finding. I tried this after finding out my jump rings were on the small side and it was far more work than it was worth.
9. Enjoy your handiwork.


Be the first to comment